Standing Rigging

Yacht Builders False Advertising

At boat shows, you will typically see (especially on larger yachts) a "Tall Rig" and an "ICW Rig". The difference in these two rigs is the height of the mast.

With the current push towards taller and taller spars in search of the performance benefits of high aspect ratio rigs in upwind sailing, mast heights have towered higher than ever before! This might be great for a performance enthusiast, but what about someone who wants to retire on a floating condominium and cruise up and down the ICW? All of a sudden, a 70 foot mast becomes even more of a burden and the new yacht owner is banished to offshore cruising when they would really rather just marina hop up and down the coast. 

Yacht builders have this one figured out, offering "ICW Rigs" that have a shorter mast, usually in the range of 63 feet in height. This is because the advertised bridge height is 65 feet, so having a few feet of clearance will let you transit the bridges with ease! 

The false advertising is that these bridges are only 65 feet at low tide! In the Carolinas, the tides will be close to if not greater than 5 feet, meaning that the bridge may suddenly become 60 feet of clearance. Being a fixed bridge, there is no bridge tender to call on the radio, instead you must wait for the tide to go out before you can transit the bridge.  

We have a mast height of less than 60 feet, so we feel comfortable (although it is always unnerving) passing under the bridges at any tide, thanks to the bridge clearance signs at the starboard bridge abutment. As the tide rises or falls, the numbers become visible so that way you know how high the bridge is at that moment.  

If you are looking to cruise the ICW in retirement, I would caution away from a giant floating palace with a very tall "ICW Rig" and instead opt for something with a mast below 60 feet in height. This will make your life so much simpler as you can pass under the fixed bridges as you arrive at them instead of trying to make the next bridge before the tide comes up again. 

Meeting DinghyDreams

While in Oriental, NC, we met Emily who was solo cruising on an Ariel 26. Now, Emily was different from other cruisers we have met so far for a few reasons: ​

1. She is a solo female cruiser.​

2. She does her own repair work.​

The first point really stood out to Maddie and me. There seems to be a typical group of people who are cruising, and they fall neatly into a few categories. You have the retired couple who worked their whole life with the dream of cruising and is now doing it in retirement, and then you have the younger crowd that seems to be dominated by men. ​

The younger crowd seems to made up of guys in their early 20s who want to go explore the world and find themselves! They gather up what they can and set out on a boat around 30 feet in length or less and head off cruising. They will work their way along as they travel and see the world from a perspective that most only dream of!

Some of these young men are accompanied by a wife or girl friend, but if they are alone, they are all male. Emily breaks this stereotype by being a solo female cruiser. I am not saying that women can't or shouldn't, (in fact I think everyone should!)​ but just that you rarely encounter this situation.

IMG_1875.JPG

To make it even more unique, Emily does her own repair work. She knows the setup of her boat and everything that makes it tick! If something starts to fail, she knows what the problem is and how to fix it; then when she makes her next port, she fixes it herself!​

Emily maintains a blog as well and I highly encourage you to check it out! ​

Http://www.dinghydreams.com​

She is currently heading south towards warmer waters (we all are this time of year) where she will continue to replace her aged standing rigging as she works along the way.​

Cruising is an amazing vantage point on the world, and it shouldn't be limited to just crazy young guys and elderly retired couples. Everyone who dreams of sailing off into the distance to see what's out there should certainly give it a go! If you have trouble along the way, there will always be other friendly cruisers around who will be there to lend a hand.​

Fair winds Emily!​

Masthead Fore-Aft Positioning

The position of the masthead in a fore-aft position to the mast step (also known as rake) is an important point of adjustment for sail handeling. If the masthead is too far forward, the boat will suffer from lee helm, the desire for the boat to turn downwind. If the masthead is too far aft, the opposite will occur and the yacht will suffer from weather helm, the desire for the boat to turn upwind. Somewhere in the middle of these two positions is the sweet spot where the forces will be equal and the yacht will sail straight and balanced.

For safety reasons, most yacht designers incorporate a little bit of weather helm into the yacht so that if you were to fall overboard, the yacht would eventually turn upwind and stall. This would theoretically allow you to swim back to your yacht and perform your own rescue. 

While the theory about masthead position is all well and good, it can be a bit daunting to perform in practice. When you stand on the deck, the mast just looks like it goes up. It is almost impossible to visualize if it is slightly forward or aft of its desired position. Even more compounded when the specifications call for the masthead to be raked 8 inches aft. 8 inches aft of what?! How can you tell where the masthead is way up there and then how are you supposed to position it 8 inches aft? 

There is a simple trick to this dilemma, and it involves gravity. 

A mast is supposed to be raked aft. This means that the front of the masthead will lie over the mast base and the rear of the masthead will hang aft of the entire spar. The main halyard exits the masthead on the aft side of the spar and is thus the perfect candidate for this exercise and measurement. By hanging a large jug of water, say around 1 gallon, by the main halyard, the halyard will transform into a plumbline which can be used to measure the position of the masthead relative to the step. 

If you have access to a drawing of your boat by its designer, it will usually tell you how many inches aft the mast should be raked. If you have this information, all you need to do is tighten the backstay while you loosen the headstay and move the masthead aft until the halyard (which is now a plumb line) marks the distance desired. 

The point that you will be measuring will be your gooseneck, which you can think of as "inch 0" since it attaches to the aft of the mast. Each inch aft of the gooseneck as you move down the boom will be your point of measurement.  

For example, if you need to position the masthead aft by 5 inches, you will simply adjust the headstay and backstay until your halyard crosses the boom 5 inches aft of the gooseneck. 

Having a designer tell you how to set everything up is wonderful, but what if you are not graced with that knowledge? There is a simple starting point that can point you in the right direction. 

In general, you want your masthead to sit just aft of the mast step. If you think of the spar as a tube in space, and you compress the tube vertically until it is nothing more than the oval at the bottom and the oval at the top on a flat plane; you would see the oval at the bottom (the mast step) sit right in front of the oval at the top (the masthead).  

What this means is a good starting point is to position the aft side of the masthead the distance aft of the gooseneck that the spar measures fore-aft. If you have a 4 inch spar, you will hang your halyard plumb line 4 inches aft of the gooseneck. If your spar is 12 inches fore-aft, then you will hang your halyard plumb line 12 inches aft of the gooseneck.  

This is obviously just a starting point and should be adjusted from there depending on how the balance of your yacht feels. If you find that you have too much lee helm, rake the mast further aft. If you find that you are struggling with weather helm, ease the masthead forward a bit. 

With tuning and practice, you will find the sweet spot that your mast likes to be for your given yacht and sailplan. Most importantly, when you find this sweet spot, measure it and write it down so that the next time you take your mast off, you will know exactly where to set it when you are recommisioned. 

2 Year Headstay Inspection

Wisdom, our 1968 Morgan 45 was re-rigged with synthetic standing rigging back in 2015. The headstay has endured use, abuse, and a lot of weather over these two years. Our headstay's deadeye got severely damaged by our anchor and needed to be replaced, giving us a wonderful opportunity to evaluate how the stay is holding up at the bow.​

The bow is known to be the harshest place on a yacht for rigging. Every single wave that splashes up will wet the stem and the lower part of the headstay in a fine misting of salty moisture. This mist will work its way into the tiniest nooks and crannies in your headstay, causing devastating corrosion from the inside out.​

IMG_1830.JPG

To make life for your stem fittings even harder, being up at the tip of the bow, they are often ignored and forgotten, as the rest of the boat gets cleaned regularly, but the headstay might only get a quick splash with a hose.​

On most yachts, the headstay lives inside the furler, where it is forgotten and ignored until something breaks. On yachts with hank on sails, the headstay is easily inspected, but still neglected.​

Synthetic rigging prevails in these hardships, as the Dyneema fibers are made out of plastic and are immune to corrosion caused by moist salt spray. Let us see what lies beneath the surface of our headstay!​

IMG_1873.JPG

Under all those wraps, you will find the true knot that holds the entire stay in tension: The Shroud Frapping Knot. This knot pinches and seizes the lashings together with such ferocity that even slippery Dyneema can not escape its hold.

IMG_1846.JPG

This knot is tied while the tails of the lashings are under tension with the entire tensioning system. While the lashings are tight and under load, the Shroud Frapping Knot pinches them in place, allowing you to remove the tensioning lines without losing any tension in the headstay. 

IMG_1848.JPG

This relatively simple knot can be a bit time consuming to tie, taking me close to 20 minutes, but it will hold steadfast for years, never yielding nor giving way as you sail. 

IMG_1868.JPG

On stays that will require a significant amount of tension, it is best to use oversized thimbles as they will accommodate more wraps with the lashings, giving you significantly greater mechanical advantage to properly tension the stay. They also provide a wider radius turn which imparts less stress on the fibers of the lashings.

IMG_1852.JPG

With the tension removed and the lashings untied, you can see the inside of the eye splice at the end of the stay. The fibers have flattened out as they have been pressed into the thimble for two years. There is some slight corrosion staining that appears on the eye splice, and this is from slight surface rusting that occurred on the stainless steel thimble. 316 Stainless Steel is famed for being corrosion resistant, yet in two years on the bow, it has begun to corrode in places that are not visible to external inspection. Imagine if this were a steel headstay with steel fittings swaged together up here. Corrosion would have already set in and it would be a countdown until something failed in a catastrophic manner. 

Synthetic standing rigging is immune to these sorts of problems and the steel components utilized are small and easy to inspect, making their impact on the entire situation much less grave. 


Deadeye Torture Test

Synthetic standing rigging, made out of Dyneema, is stronger than steel rigging but several times lighter. This allows your yacht to have less weight aloft while having more strength to hold the mast upright. The result of this is your yacht will become less tender and perform better in all wind conditions. 

As if all of these facets of synthetic standing rigging were not wonderful enough, it has yet another shining attribute of greatness, it can't corrode!

Dyneema is made out of UHMWPE, which stands for Ultra-High-Molecular-Weight-Poly-Ethelene. The important part in that long word is Poly-Ethelene, another word for plastic. We all remember those commercials from the 1990's when they would show some miracle being performed, like saving a premature baby, or transporting clean drinking water, and they they would finish with "Plastic makes it possible." Once again, the world of plastics has had yet another breakthrough and can now create fibers that are stronger than steel, weigh next to nothing, and (since they are plastic) never corrode.

Your standing rigging faces a harsh life on a yacht. It is often ignored or overlooked while constantly bathed in moisture and salts. The stays are all crushed at the ends, making them grasp the wires as they slowly but surely begin to rust. In time, the corrosion will become so severe that the stay will break and fail, all because of a little moisture on its surface. 

Synthetic stays are immune to this issue, as they will not absorb, nor will they interact with moisture on their surface! While freeing your mind from the concern of corrosion may sound grand, there is one weakness specific to synthetic standing rigging: chafe. 

Chafe will break individual fibers on the stay, gradually weakening it until it will fail under the load it is frequently subjected to. Chafe, however, is easily avoidable. If you see your sheet rubbing on your stay, simply re-route your sheet to avoid this contact. If you know the stay will be chafed to carry out its task, simply add a chafe sleeve to it, or if the chafe will be severe, add service wrappings to provide an even more durable layer of sacrificial protection. 

This is all well and good, but what happens if you overlook something? What if a part of your rigging becomes chafed quite severely before you notice it? How bad can it get?

While sheets chafing on your stays is bad (in the long run), they are not your worst of concerns. You should look at all items on your yacht as potential chafe offenders and secure them in a way that they can not cause any harm. I protected my headstay against chafe from the hanks, but I neglected to consider what could happen if chafe between the deadeye and the anchor occurred.

IMG_1793.JPG

In this destructive experience, the anchor lept out of its roller and laid against the deadeye for 3 days while in a storm. The results were quite devastating. 

IMG_1839.JPG
IMG_1861.JPG
IMG_1837.JPG

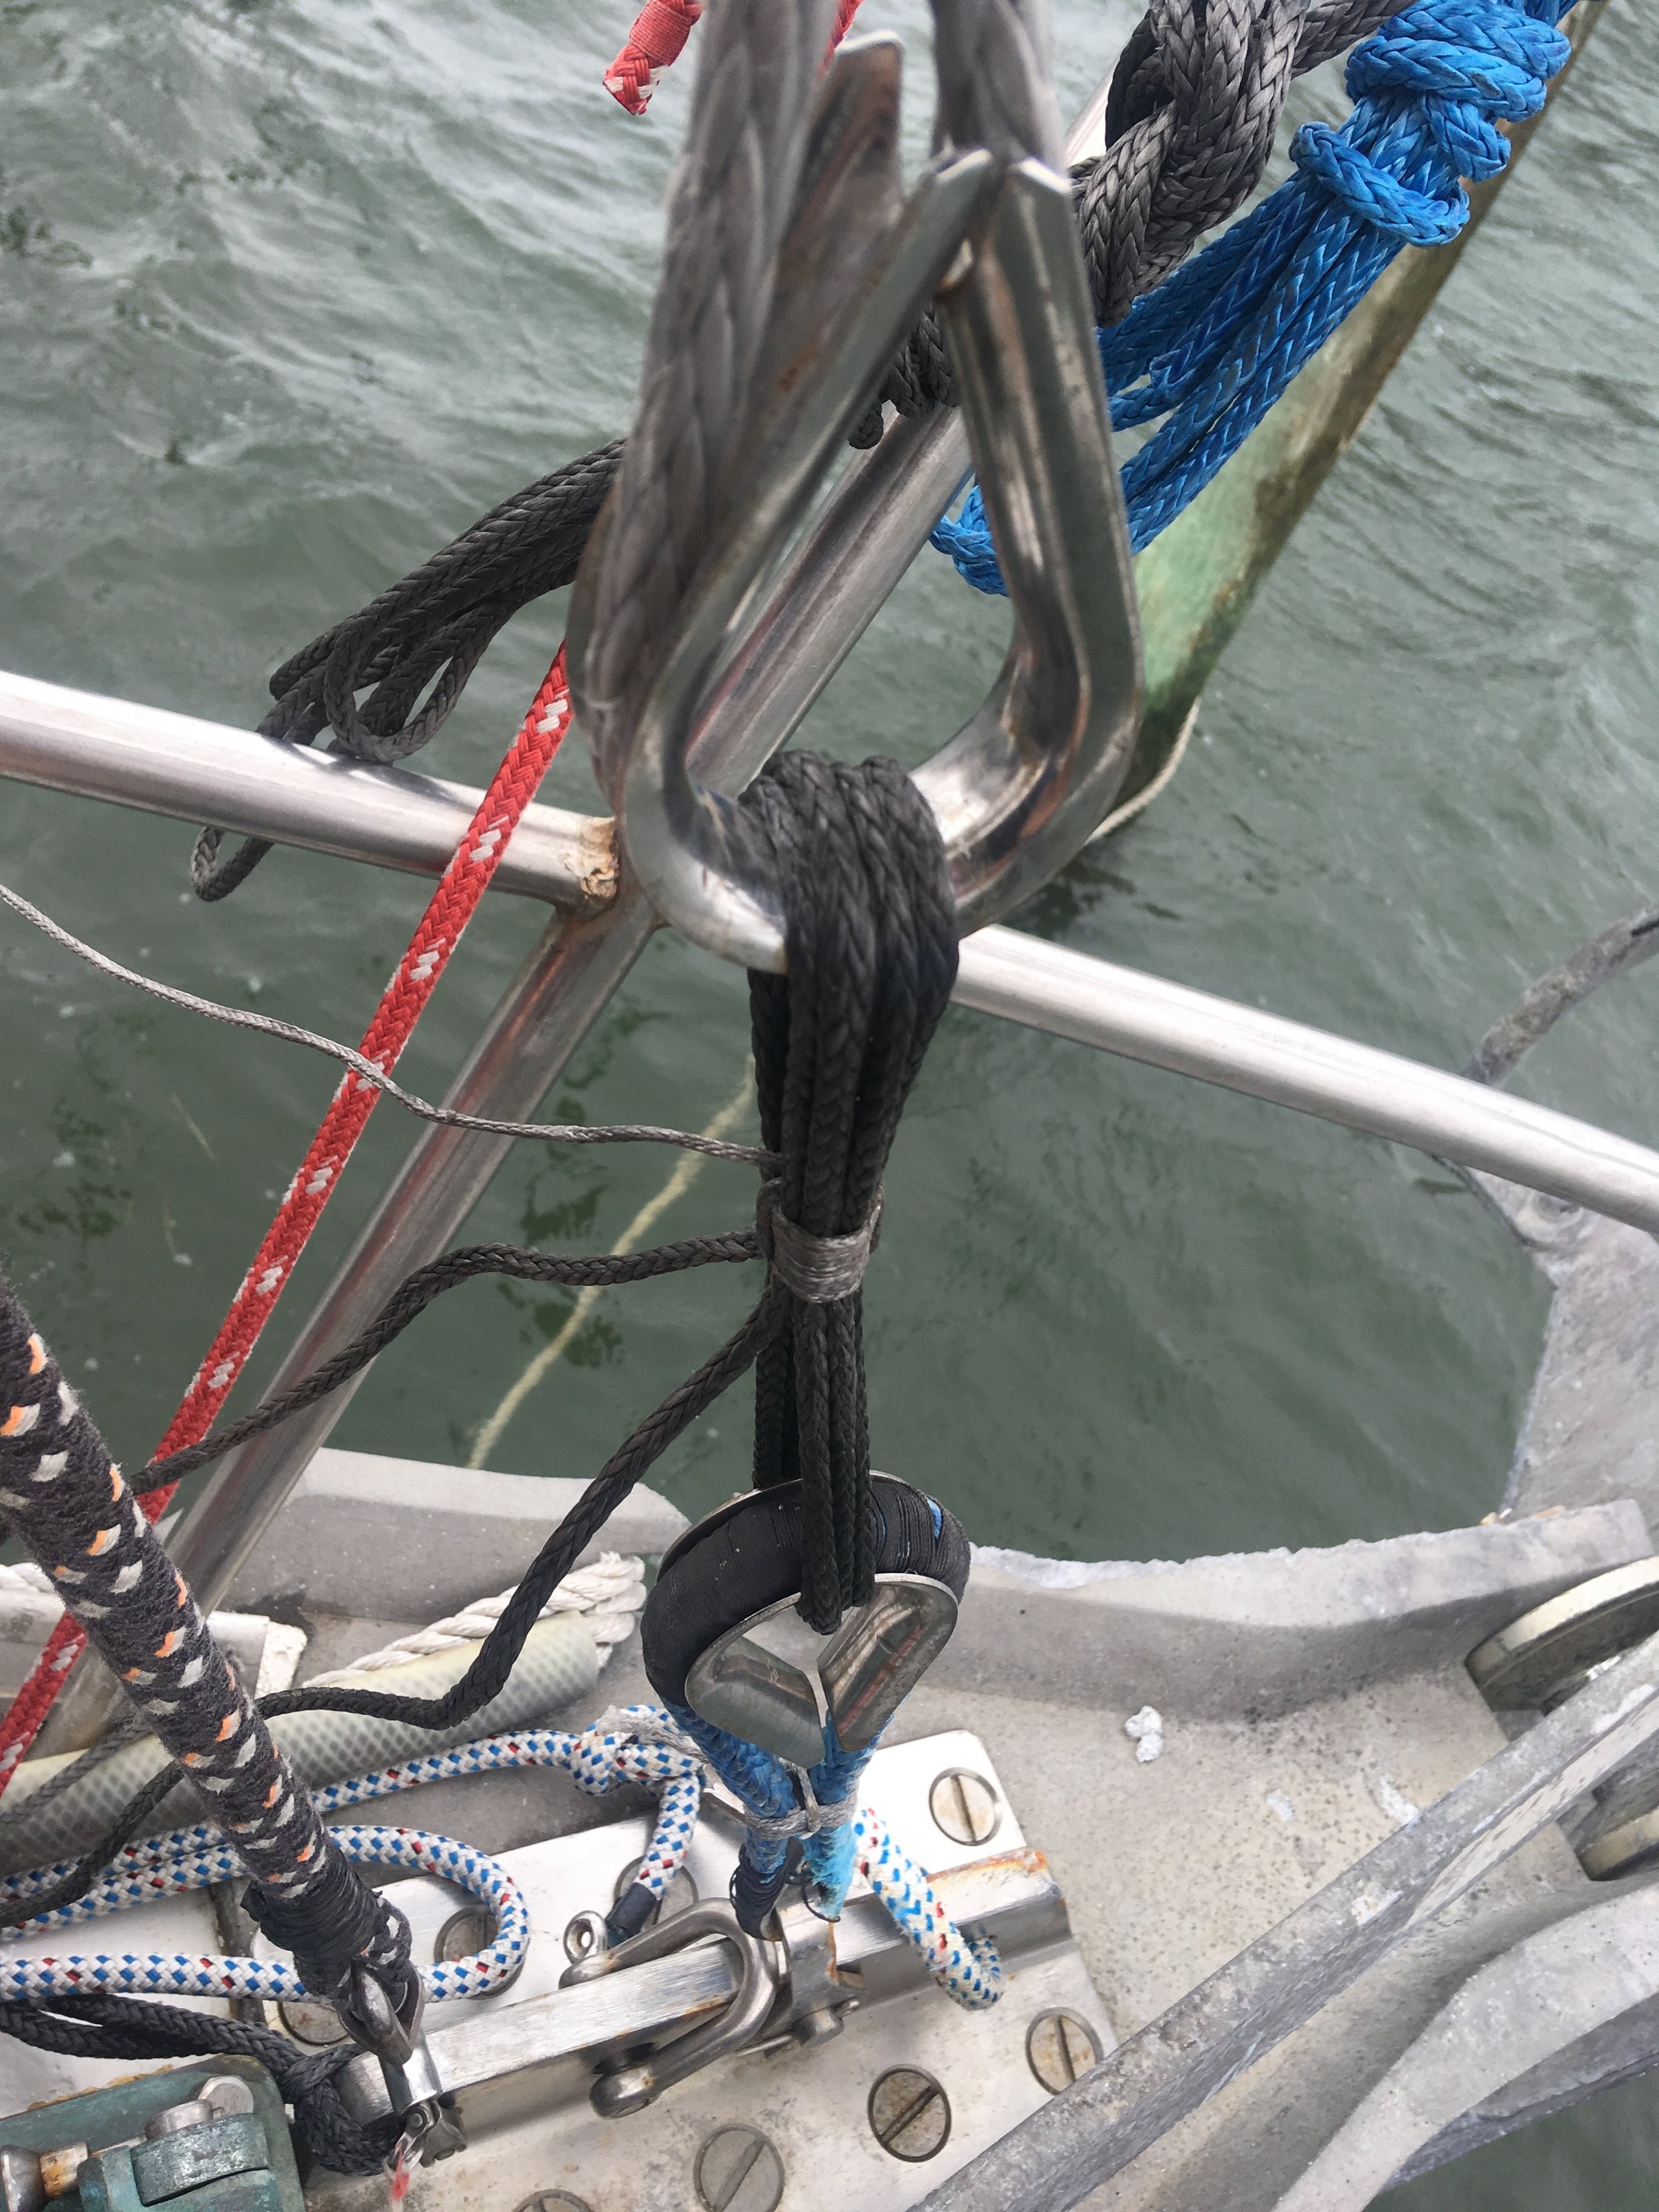
First, the thimble that produces a nice and appropriately radiused bend was bent fiercely by the shank of the anchor. The Dyneema of the deadeye was the next piece in this destructive path. Several strands of the grommet were chafed through completely, making this component severely weakened and in immediate need for replacing. 

IMG_1865.JPG
IMG_1847.JPG

The damage only occurred on one side of the deadeye, as the anchor only laid on one portion of it as it chafed away. This did mean that several of the strands were still intact, though they were weakened by the tight radius bend through the toggle. The toggle itself also appears a bit flustered by the entire situation, as surface rust is present (thankfully, the surface rust is actually rust from the anchor that rubbed off on the toggle) and the corner of the toggle is a bit rounded from the constant pounding. This constant impact will work harden the metal in the toggle and make it more prone to cracking in the future.

Now, while this damage may seem severe, it was easily avoidable by properly securing the anchor, and it was also easy and inexpensive to repair. 

The cost of materials for a new deadeye are merely the cost of 4 feet of dyneema in the size you used. This particular deadeye was made out of 9mm SK-78 dyneema and the materials only cost around $20. The deadeye itself takes about an hour to make, making the entire repair not that intrusive on the wallet. Should a situation like this arise, I carry a "pre-made" deadeye in our box of spares, that way I can get straight to work and not worry about taking the time to manufacture one should the need arise.  

While synthetic rigging is stronger than steel, it is quite fragile by comparison. Special care should be taken to ensure that no chafe occurs. If a component becomes chafed, you can always refer to this post for guidance as to its continued serviceability. 

https://www.riggingdoctor.com/life-aboard/2015/10/16/how-much-chafe-is-too-much

Chafe is a fact of life on a sailboat, but thankfully it is an easily inspectable problem that shows signs externally, unlike steel rigging which can corrode away internally and only show problems that are detectable to a trained and professional eye.  

One last point about the durability of Dyneema. This deadeye became severely chafed during a gale that lasted for 3 days. After the gale, we sailed 80 miles around Cape Hatteras in winds ranging from 30-45 knots and the deadeye remained functional, holding the mast up. We did not load the headstay with a sail, as that might have pushed it beyond its remaining strength, but we did fly a staysail and double reefed main in these wind conditions as we beat to windward. The deadeye was under intense and severe load during this ordeal, and yet it remained intact during the whole event. If chafe is a concern in your mind, let my misfortune of a mangled deadeye demonstrate to you that even in a disfigured state, Dyneema is rediculously strong and will stand up to the abuse to get you home safely!