Navigating

Sailing from Georgetown to Charleston, SC

Georgetown is a small port town, Charleston is a large port city! While we had just made it to Georgetown, we really wanted to get to Charleston, and the winds looked like they would be favorable for this journey. 

Charleston is located about 40 miles south of Georgetown, inlet to inlet, but the distance from anchorage to anchorage is around 67 miles. The added distance comes from navigating the inlets and avoiding the offshore shoals before you can finally head to the next inlet. 

Now, the issue is the prevailing winds blow from the South, meaning that this journey would usually require beating for 40 miles to windward. Instead of slogging along, the alternative is to wait for a cold front to come through and reverse the winds. This is a delicate subject, as not all fronts are created equally.  

You would not want to head out into a powerful cold front, but at the same time, a weak front might not generate enough winds for you to actually sail. 

The way the weather was looking, the current cold front was creating winds of 30 knots from the North and massive seas; not exactly ideal to head out in. As the front passed, the winds began to die down, we then headed out and rode the tail end of the storm. The winds were on the light side, but still enough to motor sail at a very slow pace of 2-3 knots. 

The light winds meant that we needed to listen to our generator for 23 hours straight, as we motor sailed along the coast, but they also meant that the seas were calm and the voyage was uneventful. 

Aside from the winds, the next consideration to take into account is the tides. The tidal currents in these inlets can be quite dramatic, so it is best to time your passage of the inlets at slack water, when the tides are lightest. 

To accomplish this, we raised anchor at 4:30 AM, and left the anchorage by 5:30 AM. We were heading down the river for 16 miles as the current was pushing us back up. This meant that we were slowly moving, but we did manage to reach the inlet at slack water. Slack water is especially important when navigating weird inlets that have sand bars and breakers. You might think you are steering clear of an obstruction, but the current will take you right onto the shoal and pummel you with breaking waves! Slack water takes this fear out and gives you a short window of time to scoot through easily. 

Once we made it out into the ocean, we were faced with the leftover slop from the previous storm. The seas were merely 6 foot swells that were causing us to toss around; a stark distinction to our still time on the ICW. Had there been a strong current, these seas would have been even more miserable for us as we transitioned from river to ocean sailing. 

Motor sailing with an electric motor and generator is very uneventful. Every effort is taken to alleviate the slating of the sails in the windless patches, and any puff of wind is welcomed as it grants you a speed push. 

As we reached Charleston, the sun was setting and fog was rolling in. Charleston is not an easy inlet due to the rock jetties and all the confusing lights that exist as you enter. The fog actually made this simpler, as it obscured the city lights and only allowed visibility of the next lighted buoy. Since fog was present and this is a major shipping port, I made my presence known on CH 16. The local tug boat captain conversed with me to make sure we would not have any close calls. He found us on his radar, I found his navigation lights on the horizon. As he approached, I stayed to the right of the channel and we had a very peaceful passing in the night. Had we not communicated, this situation would have been much more stressful.  

While I don't like to rely on electronics, having Navionics on my phone made entry to the port and anchorage possible. When the channels divide, the blue line on the screen tells you which is the correct way to go.  

We left Georgetown at 5:30 am and arrived at Charleston at 5:00 am. This made for a very long day, but it got us to a new city with benign weather. 

South Carolina Draw Bridges

While most  draw and swing bridges on the ICW will correspond on channel 13 of VHF radios, the bridges in South Carolina will not. They operate on Channel 9! 

Another distinguishing feature of the South Carolina bridges is they do not open on a set schedule. Most bridges along the waterway will open on the hour. If you are there at that time, you will get to pass and continue on your way. If you are not there at that time, you will have to wait for the next opening to occur. This means that if you arrive 5 minutes late, you will have to wait for 55 minutes until the bridge opens again.  

Timing the bridges becomes very important as it can allow you to cover many more miles in a day instead of waiting around all day long. It is also important to time the bridges with the tides. The current in the ICW can be pretty fierce, especially near bridges where the waterway narrows and the speed of the current increases. If you miss a bridge, you might have to fight a 2 knot current for the next hour, motoring through nearly 2 miles of water while not moving an inch over ground! 

Now, back to South Carolina. The bridges here open on demand. As you approach the bridge, you simply radio the bridge on Ch 9 and let them know that you would like to request an opening. The bridge tender wants to know what your boats name is, and where it hails from. 

If you don't give this information when you hail the bridge, the bridge tender will ask you for it. To speed up the conversation, all you need to do is identify yourself with your vessel name and port and that you are requesting an opening. 

For example: "Hello Swing Bridge, this is Southbound Sailing Vessel Wisdom from Baltimore Maryland requesting a bridge opening when you feel that I am close enough" 

To this the bridge tender will respond and acknowledge your call, thank you for the information, and let you know when he feels you are close enough. When he begins to open the bridge, he will radio you and let you know so you can pick up the pace a little bit and get through quicker as to not hold up traffic as much. 

So, you don't have to time the bridges in South Carolina, as they open on demand, but they do operate on a different channel (9 instead of 13). 

Cape Fear and Heading South in the ICW

The ICW, also known as "the ditch" is a narrow cut of water that runs along the East Coast of the United States. It is famous for being long, straight, and boring. This all holds true, but it does offer one huge advantage, you get to stop for a good meal and a good nights rest every night!

The waterway is rather narrow, and when heading south after Cape Fear, the tide becomes rather dramatic. 6 foot tides are common, and that means that a lot of water will flow through the inlets creating a very strong current.  

We decided to continue heading south through the ICW instead of going offshore for two reasons:
1. It's really cold outside in January.
2. Weather in the ICW is not important. 

Rather than going offshore from Cape Fear to re-enter at Georgetown, we decided to continue mucking along in the ICW because of winter weather.  

Today, we had sustained winds of 20 knots with gusts over 35 knots in the ICW while the waves were only around 3 inches tall. Yes, flat water and 20+ knot winds! Oh, and it was in the low 40Fs today too. 

When we passed the inlets, we could look out at the ocean, where the winds are stronger since there are no trees or houses blocking the wind, and the waves out there were massive, from the mouth of the inlet to as far as the eye could see. The ocean looked like a sea of white caps, while we continued on peacefully in the calm and tranquil waters of the ICW. 

The best part of it all, when we get tired, we simply pull over to the side of the channel and drop the anchor. This lets us relax, eat, and sleep well knowing that we are safe and sound. If we were offshore tonight, we would be freezing as we struggle through the night watch, hoping to reach the next inlet. 

While the ICW might seem like a cake walk, it does have one strong feature that will dictate any motion you try to make: the currents. It is common to see a small wake form behind your anchor chain as it exits the water, as the current will be ripping through the waterway. If you have the current in your favor, you will cover many bonus miles that day, while if you are fighting the current, you will face an uphill battle. 

Be sure to check the tides to decide when you will move and when you will anchor, as the currents will be your biggest concern in the waterway.  

Once you leave Southport at Cape Fear, you will only have four inlets to contend with, and only 3 of them are serious inlets. This means that once you pass the last inlet (Little River Inlet), you will have over 60 miles of gorgeous waterway with no more inlets creating confusing tides. Everything will be easy to calculate as you make your trek with the tides all the way to Georgetown! 

Weather Routing and Barometers

After our fateful storm off "The Graveyard of the Atlantic" where we headed out into what seemed like calm weather and insufficient wind to carry us the needed miles, followed by a drawn out and intense storm; we have started looking into a proper weather routing system.

A quick google search of weather routing will yield a wealth of options, all are programs and none are information. I thought this to be rather odd, because I wanted to learn more about weather routing and not ask a program for an answer.

Most of these programs charge for their use, but some of them are free! Now, having a good weather program sounds great when you are on land and connected to the marina's WiFi; but when you are offshore, everything changes! Power to run your computer becomes a taxing draw on your battery bank and all this distance from shore means that WiFi signals are a faint memory. Getting internet on your boat when you are still close to shore is possible by using your cell phone as a hotspot, but when you are out of range of cell phone service, the solution is very expensive.

Iridium Go is a viable solution until you price the package out. The unit itself costs around $1,000 and the subscription costs between $50 and $200 per month, depending on which plan you sign up for. Mind you, this unit and plan are considered to be the most economical method of getting internet on your boat while out at sea! 

So, the weather routing software is expensive, and the connectivity to use them where you would need them is also expensive. Instead of bursting our budget of $500 per month, I decided to dig a bit deeper. While these programs calculate the best route to get from Point A to Point B, the program itself was written by a human, so there must be some theory that the programmer used to base the calculations on.

Playing around with a few programs, I noticed a trend emerging with the route that they would suggest. They all seemed to follow the 1020mb isobar line. Any two points, anywhere on the map, the route always seemed to follow this isobar as best it could. This was my first clue into an enlightening discovery.

While 1020mb may seem like an arbitrary isobar, this region is known for having mild and steady winds. If the pressure is greater than 1020mb, you risk reaching the center of a high pressure system where the wind vanishes, and if you venture into areas where the pressure is less than 1020mb, you risk running into a low pressure system with its associated storm conditions. It seemed that there was something magical about 1020mb.

In further reading, I found a review of 5 popular (payment required) weather routing programs posted by Sail Magazine.At the end of the review, the author noted that all of these programs  "...aim for a course very close to the 1020mb pressure isobar. There’s something to be said for the old-timer’s simple route planning." (Source: https://www.sailmagazine.com/cruising/weather-routing-101-part-2)

That line: There's something to be said for the old-timer's simple route planning. That stuck out to me as it confirmed that the weather routing programs that charge are also following along with the 1020 isobar line! 

When following this line, the winds appear to be steady and uniformed in the same direction as it revolves around a high and low pressure system. The winds circulating around a high pressure system will always rotate clockwise while the winds circulating around a low pressure system will always rotate anti-clockwise (in the Northern Hemisphere). Knowing this, it is possible to pick a downwind route from any Point A to Point B by following the 1020mb isobar around high and low pressure systems!

A while back, my dad offered me his grandfathers barometer to take with us on our voyage. At the time I declined the offer because I didn't see an immediate need for it and didn't want to risk its safety while on board. I would forecast the weather by looking at the clouds and found no need for a barometer as the clouds would tell me if the pressure was rising of falling based on their formations. 

Now that I know we want to follow the 1020mb isobar, I suddenly had a use for a barometer and took my father up on the offer to borrow his grandfathers barometer (my great-grandfather). The line from that review "old-timer's simple route planning" struck in my head as I looked at the face of the barometer!

FullSizeRender.jpg

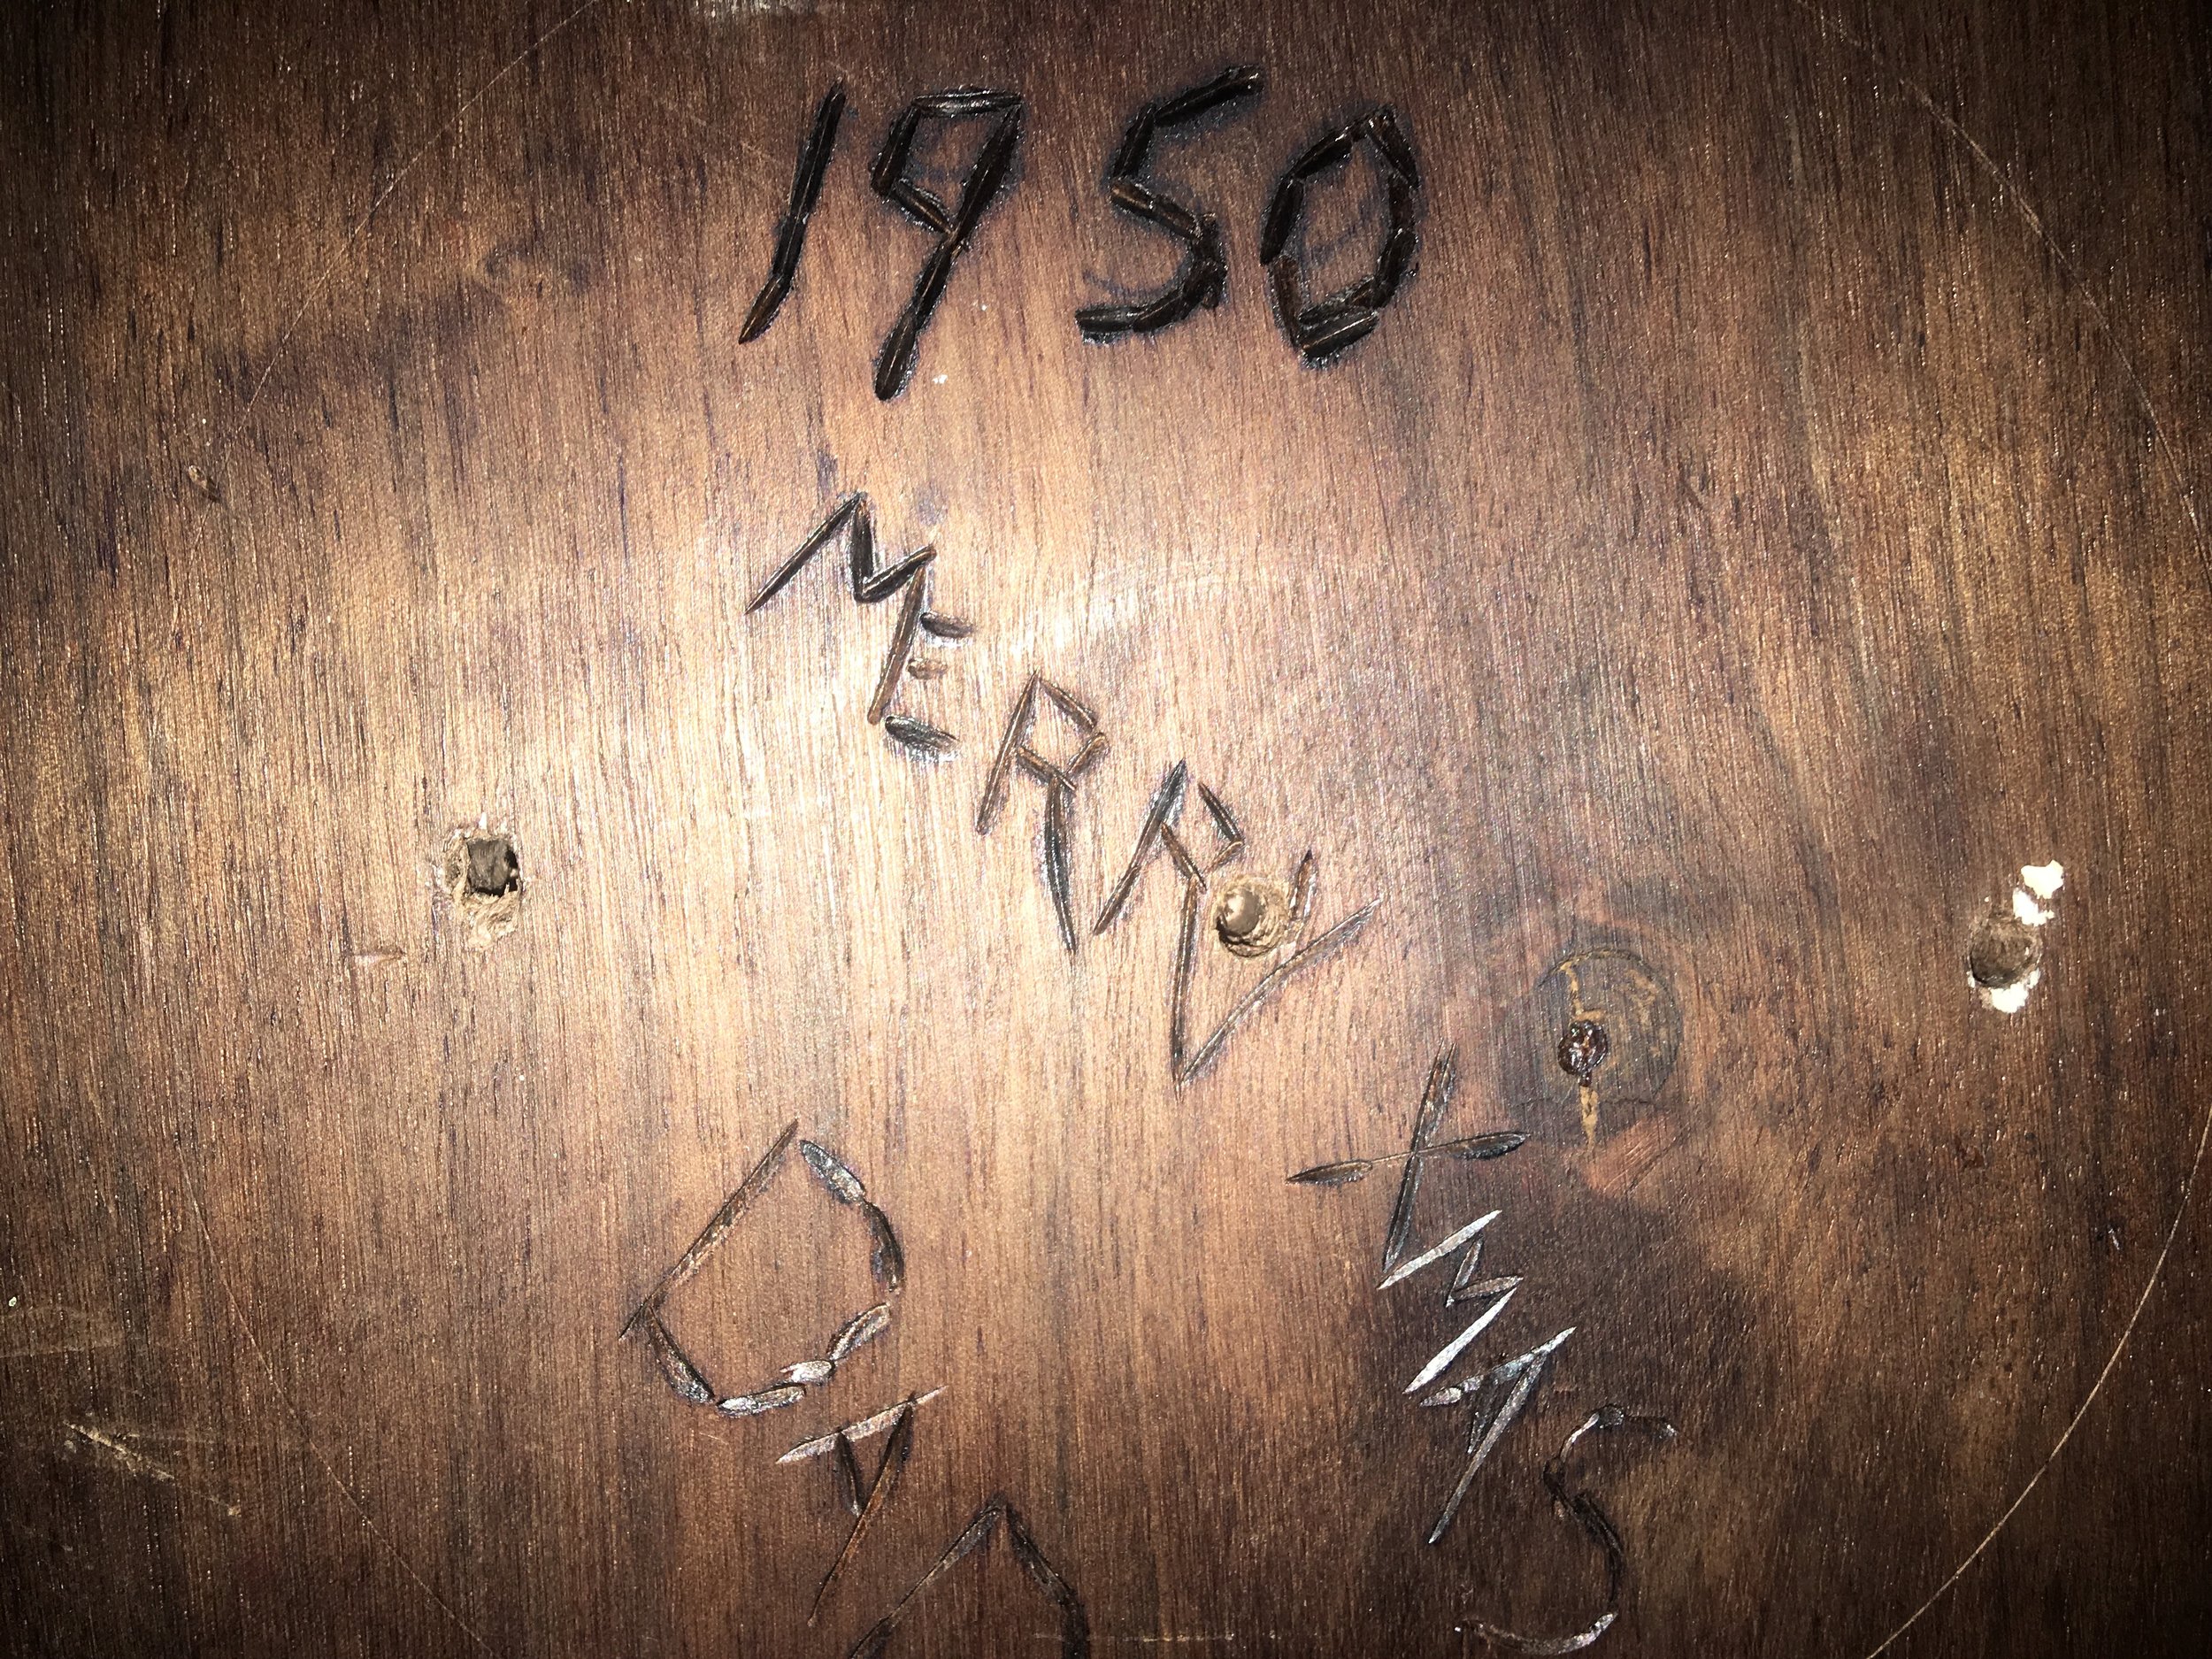
This barometer is certainly old, being a gift from my grandmother to her father in 1950, about 68 years ago!

IMG_1225.JPG

Note how under the 1020 millibar number, the word is "Fair". Seems that the old-timers made barometers and weather routing simple and easy to do. Keep the needle on "Fair" and if the pressure starts to change, alter course based on the wind to bring your yacht back into the "Fair" isobar.

This is easy to do without any fancy weather instrumentation or connectivity, all you need to do is stand outside and point! Thanks to the Coriolis Effect, when you stand face into the wind and extend your right arm straight out to your side and point, you will be pointing at the center of the low pressure that is causing these winds.

If the pressure is dropping, you are too close to the low pressure system and need to alter course away from it. If the pressure is climbing, you need to sail closer to the low pressure system.

The concept sounds simple, and if you look at current weather charts, you will see that the winds along the 1020mb isobar seem nice, ranging from 15-20 knots of wind along the entire route; but reality always has a way of rearing its ugly head.

Weather is not stationary. The 1020mb isobar will not stay where it is and allow you to sail around the world along this magical corridor of good weather. Nay, it will move around as the high and low pressure systems of the world dance around the surface of the Earth, causing the isobar to move, sometimes quicker than you can move your yacht. This means that while you may intend to stay in the 1020mb isobar, the 1020mb isobar may move away from you at a speed you can not match, and you will get caught in foul weather from time to time as you voyage.

This is a fact of cruising, but knowing what to look for in the weather and how to route your course to improve your chances of good weather is imperative to a happy cruising experience.

So, before you sign up for a complicated and expensive weather routing program and service, consider doing what the old timers used to do: sail where the weather is "Fair" on their barometer.

Free Weather Routing Software and How To Use It

In the world of weather routing, subscriptions and expense seem to be an accepted reality. All the "Free" programs simply let you look at the awesome software, but charge you to get any actual information out of them. In my quest for a budget friendly version, I discovered a free (and I mean completely free) program. It is a bit complicated, but I will walk you through all the steps involved in getting your own personal weather routing information!

I will include all the downloadable files on this page, as well as links to the original pages that have the information and links.

The free weather routing program is called "Bluewater Racing" and it is available for download at: http://bluewaterracing.com/index.php?option=com_phocadownload&view=category&id=1:windows&Itemid=66

Weather Download.png

Simply click the "Download" button for the Full Version and install it like any regular program you install on your computer.

This program is the weather routing software that will run the calculations based on the weather data that you give it. When you open the program, it will look something like this:

Weather Program 1.png

Now, this program is easy to use, but there is some learning required to get the most out of the program. I highly recommend running the tutorial which can be found here: http://bluewaterracing.com/index.php?option=com_weblinks&view=category&id=38&Itemid=62

Having the program may seem simple, but it is only part of the equation. The other part of the equation is the wind data in the form of a GRIB file. Some places offer these files for a fee, but once again, you can get them for free by emailing your request to "query@saildocs.com".

The way it works is you compose an email to query@saildocs.com where you ask for the weather pertaining to a specific area. The email looks something like this:

Weather Program 2.png

No subject is needed for the email. Simply type "Send gfs:(and then the coordinates for the area in question with no spaces)"

In this example, I am requesting an area from 40N down to 10N, and from 62W over to 82W. Separate the coordinates with comas, but do not use any spaces, so: 40N,10N,82W,62W

Basically, the formate is: (Top Coordinate),(Bottom Coordinate),(Right Coordinate),(Left Coordinate)

Then you click send, and your strange little email goes off into the internet; quickly replied by a machine which will send you a GRIB file as an attachment.

Weather Program 3.png

Now, click on the attachment and download it, then open it in the "Bluewater Racing" program.

Weather Program 4.png
Weather Program 5.png

Now, you can see displayed on your free program all the wind information for the area you wish to sail. 

After all these steps, you finally get to begin your weather routing software adventures!

Weather Program 6.png

Zoom in on the area you want to start your voyage from and click on "Edit" at the top menu. Then, Right Click on the screen where you want to begin your journey and select "New Route". This will give you a starting point. Next, zoom out until you can see your destination on the entire page. You will Left Click near your starting position and hold the Left mouse button and drag it towards your destination. This will generate the next point and you can then drag it to the destination. If no point forms, then you are too far from the first point, so try again a bit closer to it.

Weather Program 7.png

Now, you need to "manage the route" by clicking on "Tools" and then "Route Manager".

Weather Program8.png
Weather Program9.png

Now you will click "Opimize" and let the program run its magic! 

An important thing to note, is that this program comes pre-installed with the Polar Chart Data for a J120, which is a pretty high performing yacht. If you are cruising in one of these: Congratulations! If you are not cruising in one of these, then you will need to program in your own polar information. I created one polar chart for Wisdom which is a full keeled cutter, with much slower numbers than the J120, and I also created a polar chart that will trick the program into only providing you with a downwind route!

Save this file in the Polar files of Bluewater Racing, and use it to route yourself going only downwind routes.

Weather Program12.png

With the "Downwind Only" route saved, click on "Options" and where it says "Boat Type" type in "downwindonly" and this will load the downwind polar data onto the program.

Weather Program11.png

With the data entered, then click optimize and observe the time that it will take to make the run. "r1" will display a route that is direct. "r1_0" will display the "optimized" route to your destination.

You can see how the J120 would get there in just over 3 days, but the downwind boat will get there in just under 13 days!

Weather Program13.png

The straight line is the route planned without optimization, while the other route that goes all over the place is the downwind route.

By using this program and the GRIB files retrieved by emailing query@saildocs.com, you are able to plan when to leave and what route to take, all for absolutely free!