Navigating

Chart Symbols: Bottom Composition

Bottom compositions are notated on charts using a system of letters that convey the necessary knowledge to the navigator. At first, these markings may seem random and confusing, but when you boil the system down to it's basics it turns out to be rather intuitive.

Chart symbols referring to the bottom composition will be located amongst depth soundings and will begin with a capital letter. If the symbol is only one letter, then it will be capital. Modifiers about the bottom composition will be in lower case letters.

S: Sand
M: Mud
Cy: Clay
Si: Silt
St: Stones
G: Gravel
Grs: Grass
K: Kelp
P: Pebbles
Cb: Cobbles
R, Rk: Rock
Bo, Blds: Boulders
Co: Coral
Co Hd: Coral Head
Oys: Oysters
Ms: Mussles
Sh: Shells
Vol Ash: Volcanic Ash
Wd: Weed

Modifiers to the bottom composition are:

f: Fine
m: Medium
c: Coarse
bk: Broken
sy: Sticky
so: Soft
sf: Stiff
v: Volcanic
ca: Calcerous
h: Hard

Once you know the language, it is simply a matter of putting the words together to spell out the bottom conditions. They are always stated with the main bottom constituent first.

fS M bk Sh: Fine Sand with Mud and Broken Shells
S/M: Two layers, Sand over Mud
hS Sh: Hard Sand with Shells

Just remember that modifiers about the bottom are in lower case letters, while the bottom composition starts with a capital letter. When the bottom is composed of more than one substrate, it will be listed from main bottom constituent, followed by the lesser constituents.

Navigating Under Sail Using Lubbers Lines


upload.jpeg

The compass is on of the most valuable navigational instruments on a sailboat! The require no electricity, they do not need software updates, they just work! 

The compass lives on the top of the binacle, where it can always be clearly seen. In the compass are a series of lines that flank the compass dial, these are called "lubbers lines" and they are crucial to navigation under sail. 

In this example, I am sailing south (180) and the line that points ahead is in line with the ship, and marks our heading as 180.  This line is simple to understand, as it points in the direction you are going. 

If you look around the compass some more, you will see several other lubbers lines.  

upload.jpeg

These other lines are set at +/- 45 degrees and +/- 90 degrees to the heading line. In our case, with a heading of 180, the next lubbers line to port would be 135, followed by 90, and to 225 and 270 to starboard. 

What do these lines mean and what is their purpose?  

Let's start with the +/- 45 lines. These lines show the approximate wind direction. If you are sailing as close to the wind as possible on port tack, and your heading is 180, the wind is coming from the port 45 line: 135. This means that the wind is coming from 135.  

If you were on starboard tack, then the wind would be coming from 225. 

The next line is the +/-90. These lines indicate your new heading after you tack. So if you are sailing as close to the wind as possible with a heading of 180 on port tack, the wind would be coming from 135, and your heading after the tack would be 90. 

If you were on starboard tack, the wind would be from 225 and your new heading would be 270. 

This may sound like a fun academic exercise with no real world application, but in fact, this is vital information that is needed to quickly navigate to you windward target using the least amount of tacks.  

When you are sailing to your windward destination on port tack, with your destination on your port side, knowing when to tack is crucial.  

If your heading is 180, and you are sailing close to the wind which is coming from the -45 line (135), your beating to the destination needs to be at 90 or less or you will fall short of your mark. 

Instead of getting out a hand held beating compass, taking a sight, and plotting a course to see if you can track yet, simply use the lubbers lines!  

All you need to do is sit on the starboard side and look at your target over the ships compass.  

upload.jpeg

If the line in the center of the compass and the port 90 lubbers line line up, you know you are looking at the lines correctly. Now look up into the distance and locate your target. Once it has moved in line or aft of the port 90 lubbers line, you know you will be able to reach your mark on the next tack. 

Spotting an Uncharted Shoal

When cruising near coastlines, knowing how to spot a shoal can prove to be an invaluable skill!

New shoals can appear along a coastline, especially after periods of heavy rainfall. The runoff will carry sediment out into the water and deposit them near the shore. These shoals won't appear on charts, but they do present a very real navigational hazard.

These shoals are easy to spot, even if the bottom is not visible. The trick is to watch the waters surface! As swells approach the shore, the enter shallow water along the beach and turn into breaking waves. Shoals along the coast will have the same effect on the swells, converting them to breaking waves and warning mariners of their presence.

This birds eye view of a river draining into the sea clearly shows how the waves break along the shallow water bottom contour. While sailing along at sea level, these characteristics are not as visible, simply knowing to watch out for an area where all the waves break can warn you that you are heading towards a shoal.

Choosing an Anchorage Part 2

When it is not calm and you need to find protection for the elements for the night, choosing an anchorage becomes a very important skill! Last time we talked about dropping the hook in the middle of nowhere in calm weather where the only important factor is tide/current and bottom conditions. With stronger conditions, all the other important factors come into play.

When choosing an anchorage in strong weather, all of these points become a priority:

  • Length of time anchored
  • Protection from wind
  • Protection from waves
  • Tides and currents
  • Bottom composition

Now imagine you are sailing along in a stiff breeze and the sun is starting to set. In the distance, you see huge storm clouds coming right at you and you know you are going to be in for a rough night! Finding protection is crucial for anchoring because you will not get any sleep otherwise!

Length of time anchored: At least the entire night, maybe into the next day because you won't want to pull up the anchor to start sailing during a gale!

Protection from wind: Wind load on the rigging and spars is almost inevitable. The total windage from the hull, spars, and sails will try to pull the anchor out of the bottom and send it dragging along the bottom during the storm. To hide from the wind, you need to stay in the wind shadow of something else. To stay in a wind shadow, you need to know which way the winds will be coming from. If the wind will most likely blow from only one direction, you only need to have one feature causing a wind shadow. If it could be blowing from more than one direction, you need to have more features providing protection from different wind directions.

Wind shadows cast by an object are twice as high as the object and extend out a distance of 20 times the height of the object. That means that if the object is 100 feet high, the wind shadow is going to be 200 feet high and 2000 feet long! This means that hiding behind a small island can actually provide protection from the wind. 

This is one example where we were looking for an anchorage to protect us from a strong wind. It was slack low tide when we arrived, so the current was going to be flowing North overnight (in the same direction as the wind) and slack high tide by morning when we would be leaving. We draw 6.5 feet, dropped anchor in 7 feet of water and slid back into 9 feet of water while leaving out 180 feet of chain. If we were to drag, we would slide into deeper water and I wanted it to set again! The bottom was hard where we dropped the hook and the deeper water was softer. We did drag anchor that night, but it quickly re-set.

The small island provided protection from the wind (we know this to be true because the wind died down as we arrived in the lee). The shallow water around the island also broke up the seas, providing us a less windy and less wavy nights sleep.

While it might seem that we were anchored in the middle, we were actually very protected from the weather, hiding in the lee of the island.

Another important point to remember when anchoring during strong weather is the shock loads on your anchor and the scope of the rode. A 2:1 scope will pull more vertically as compared to a 10:1 scope which pulls more horizontally. When the boat rides up on a wave, the boat pulls back and this puts additional stress on the anchor, trying to pull it out of the sea bed. With a nylon rode, these forces are somewhat dissipated by the stretch of the rope. Chain is much stronger than rope, but offers zero stretch! This is where having extra chain out helps to provide some form of elasticity because of the chains catenary. 

Catenary is the sag that the chain will have as it comes out of the bow roller and leads to the anchor. The weight of the chain will help form catenary and act as the absorbing force. When the boat is pushed back, the force is translated into a lifting motion on the chain. The heavier the chain, the more force it will take to lift the chain, translating into more shock protection for you. 

When we anchored in the lee of the island, we had 180 feet of chain out in 7 feet of water with an effective depth of 11 feet (6 foot bow roller) giving us a scope of 16:1. Overkill, I know! I did this so that I would have enough scope if I dragged into deeper water and to give more catenary in the chain. While the lee of the island provided some protection, I believe the mast was in the wind because the boat was being pushed back quite strongly. With 180 feet of chain, the rode exited the bow nearly vertically. This means that we had plenty of chain that would need to be pulled off the bottom before the anchor would be subjected to a shock load. In addition to this, a nylon snubber was tied to the chain to give even more elasticity and to protect the ground tackle gear on the deck from shock loads.

In this example, we were sailing North when we needed to anchor for the night. The wind was from the South, so anchoring right next to the land provided us protection from the wind and the very short fetch between shore and boat provided us protection from the seas.

This river also experienced very strong currents when the tides would change. The current runs parallel to the shoreline, so I wasn't worried about being beached by the current. Current strengths are depth dependent, so staying in the shallower water was very beneficial. The difference was rather dramatic, 1.4 knot current in the shallows along the waters edge and 5 knots in the deeper water. The additional current adds strain to the anchor which adds even more benefit to hiding in the shallows in the lee of the land, hidden from wind and currents in completely open water right by the bay!

Both of those examples involve short, over night anchoring to escape some short term weather. What if you are hiding from a large storm and don't know which direction the winds will blow from or how long you will need to stay hidden? You will need much more protection!

In this occasion, a series of large thunderstorms were going to be coming through the next day and we needed to seek more protected waters. We didn't know what direction the winds would be coming from, so we searched the chart book for a protected anchorage. What I was looking for was high land encircling the water on all sides to protect us from the wind. 

While looking over the charts I came across St. Mary's River. The topography surrounding the river is composed of high cliffs providing plenty of protection from the wind. Since the wind was blocked, there were no seas to speak of at anchor!

When we arrived in the anchorage, the wind was starting to pick up. We were expecting to work our way up the river into one of the creeks to find protection from the wind, but as soon as we entered the mouth of the river, the winds died and the sails dropped. We ghosted along and dropped the anchor in the sandy bottom and settled in for the night in preparation for the horrible storms that were to come. 

The clouds passed overhead, but the winds and waves never came. This photo was taken during the time when heavy thunderstorms were passing over.

We had a very peaceful nights rest anchored in the protection of the river, where the high lands (even far away in the distance) protected us from wind in all directions. By staying in the mouth of the river, we found it easier to get out of the river and into the wind when it was time to leave. We left the safety of the river with the ebbing tide, once outside of the wind shadow, the winds returned and we were on our way once again.

Sailing Through Narrow Passes

When you think of sailing, you probably imagine open waters all the way to the horizon! While that is where we all like to sail off to, sometimes you need to sail through some rather cramped passes to get out to these open waters.

Two common narrow passes that will present themselves are bridges and channels. Both of these offer restricted amounts of water to move through, while bridges also offer disturbances to the wind.

I am going to focus on sailing through a bridge pass because it is easier to visualize and also trickier than sailing through channel. Channels have steady winds and underwater walls (usually) marked by buoys, while bridges have squirrely winds and the walls are marked by large visible pilings. Due to the added complexity of a bridge pass, I will focus on them as all this information is easily transferred to the channel pass.

The difficulties of sailing through a bridge pass are:

Narrow waterway
Not enough room to tack
Shifting winds
Boat traffic

Obviously, the pass is going to be narrow. While some large bridges have a horizontal span of 1000 feet, this may still feel tight. Single bridges are not a serious problem, all you need to do is clear the pilings and you are free and clear of the obstruction. Divided highway bridges pose more difficulty to sail through.

Bridge 3.jpg

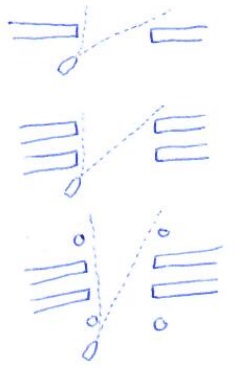
The single bridge offers a wide opening and not much length to the pass, pretty much any tack will be able to get you through this pass.

The double bridge still offers the same width of opening, but the length of the pass has been increased, restricting the angle that you can sail through the pass on.

The double bridge with abutments pose additional challenges. The width is the same as in the other two examples, but the length of the pass has been drastically increased. If you were to sail at the same angle as a single or double bridge, you would end up colliding with the pilings or abutments. This greatly reduces the angle you can safely sail through the pass.

Large bridges tend to have these concrete abutments along the pass to protect the bridge pilings from collision. This means that large bridges with long passes will have added length in the form of collision abutments.

As you can imagine, most of these large bridges with protective abutments are also highly trafficked areas, so the narrow sailing angle is further reduced by cargo ship traffic (which has right of way over a sailboat under sail due to their reduced maneuverability and restriction by draft). 

 Some real life examples are the Francis Scott Key Bridge and the Chesapeake Bay Bridge in Annapolis. Both of these are busy passes that feel rather tight at times.

Scott Key 1100 feet wide

Scott Key 1100 feet wide

Bay Bridge 1500 feet wide

Bay Bridge 1500 feet wide

As you can see, the passes are 1100 and 1500 feet wide, but due to abutment and double roadways, they can feel much tighter and pose a considerable challenge.

Naturally, the easiest way to sail through these bridges is on a run. This provides a straight course right down the middle of the bridge, clearing all obstructions with ease! If the prevailing winds have you on a run as you go through the bridge, that means that you will have to tack through them on your way back.

The next best wind direction is for the wind to be blowing with the bridge, allowing you to sail through it on a beam reach. This will also allow for a straight passage through the bridge in both directions. When sailing through the pass, stay to the windward side of the pass, this way if you have to fall off, you will have plenty of seaway to leeward. If you are cutting it close on the leeward side, any change in the wind can lead you into a collision with the obstructions.

Lastly, the hardest way to navigate a bridge pass is when beating into it. You need to perfectly time your tacks so that your course will set you through the pass, clearing all the obstructions on a single tack. If you are on a port tack, you need to enter on the left leeward corner, cross the entire pass, and exit on the right windward corner.

Bridge 4.jpg

This is an ideal course to take while traversing the pass. If you tack right on your mark, you might drift to leeward a little bit, forcing you to carry out two additional tacks to get through the pass.

Bridge 5.jpg

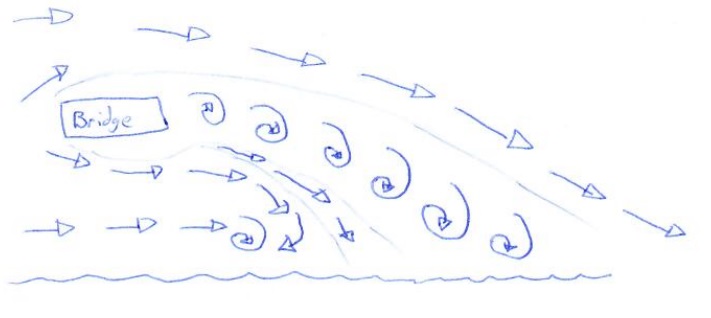
The other difficulty posed by a windward bridge is the wind shadow cast by structure.. Wind shadows can be massive! They extend twice as high as the structure creating the block, and 20x as long as the structure is high. This means that a bridge 200 feet tall can cast a wind shadow 4000 feet away!

As you approach the bridge, you will feel the wind die down, change direction, and then go back to normal. When running through a bridge, accidental jibes can happen out of no where. When beating through a bridge, it is best to overshoot your tack that way you wont be forced to carry out more tacks to compensate for a navigational error caused by the wind shifts.

When you have a double roadway, the winds become even more complicated. The air in between the two bridges can be very confusing and trying to pinch your way through can be very tricky!

Dealing with ship traffic only adds to the complexity. Large commercial vessels have right of way over a sailboat under sail when navigating within the channel. This means that you have to line yourself up to cross through the narrow pass and time it perfectly so you are out of the way of the commercial ship traffic. While you may see them, they probably can't see you! If they do see you, they also assume that  you will get out of their way to avoid a collision. This can lead to aborted attempts to cross the bridge pass which can be a frustrating.

If you begin to get frustrated trying to get through the bridge pass, just remember this:

The winds will change.

If you spend several hours trying to get through a pass because the winds are not favorable, they will probably change to a more favorable direction. This means that you can either struggle for a few hours until the winds change or heave-to, have some lunch, and try again later!

Just remember to always have an exit route. In mountain biking, we call it a "chicken route". As you approach an obstacle, if you get scared you can change direction and go around it instead of over it. We call it a "chicken route" because you chickened out and bailed on the obstacle. In sailing, the "chicken route" is simply a quick exit that will get you out of a tight situation.

If you are tacking through a bridge pass and find yourself on a collision course with a piling, try to pinch. If you stall out, try to tack. If that doesn't work and you find yourself stalled out and drifting towards a piling, jibe around and run right out of there to try again. This is your chicken route!

You must always maintain a clear exit that you can safely and quickly take to get out of a tight situation. As long as you always maintain a chicken route, you will find yourself feeling more secure in your maneuvers, no matter the conditions.

Lastly, if you are trying to cross a narrow pass and there is no boat traffic, you can always kedge across. To do this, you need to row an anchor and warp line to the other side of the pass. Dump the anchor over and let it set, then row back to the boat and begin taking in the line. The anchor will offer a secure point to pull the boat towards, pulling you right through the narrow pass. Obviously, any form of traffic will pose a hazard as the warp line can foul a prop. Once on the other side, raise the anchor and sail on! 

The limitations to this method involve the length of warp line you have on hand. If the pass is longer than your line, you will have to use multiple anchors and multiple warp lines. This method is very time consuming and slow, which accounts for why it is rarely done. This method would shine if you need to get through a very narrow pass with wind or current coming directly at you. It would not be possible to sail through something like this, so the kedge anchor will reign supreme! 

If there is no current or wind, towing the sailboat with the dinghy or sculling the yacht through the pass would also prove to be easier than setting a kedge anchor. At the end of the day, you must ask yourself "How badly do I want to get over there?"

If it's not worth the effort, maybe sail off to an easier place to enter. On the other hand if the creek is that hard to get into, it will be you might be the only one in there!