Cruising

Catching Fish

Let's face it, sailors and fishermen are two different breeds of people; but we both wish we could be each other. Fishermen get places quickly while catching many fish along the way while the wish they could get further out to sea. Sailors wish they could get places quicker and wish they could catch many fish while far out to sea.

IMG_2614.JPG

Catching fish is a great way to add fresh meat to your diet while on a long voyage. The problem is, if you are not good at fishing, it is not safe to count on caught fish as food source. We voyaged over a thousand miles, trolling the fishing line for most of the journey before we caught this little fish. I have no idea what kind of fish it was, but it was delicious!  

This did make for a very fresh meal, as it was caught, filleted, and on the grill in under an hour! This fish was rather odd as it looks like a reef fish, but we caught it in water that was 15,000 feet deep (3 miles deep). It had no teeth, and was rather small. 

When we sailed from Bermuda to the Azores, we caught this exact same type of fish again, this time in water that was 16,000 feet deep! This was the only fish we caught in a 2,200 nautical mile voyage while our friends were catching large mahi mahi every other day.  

Your skill as a fisherman will pay off when out in the ocean as you will have plenty of time to troll a line behind your yacht. Fishing will also give you a way to pass the time as you wait and see what is biting from deep down in the sea. 

How To Cross an Ocean: Navigation

You have sails, rigging, and steering; congratulations, you have a sailboat and can go anywhere. Where should you go?

This is where navigation comes into play. When you set out to cross an ocean, you need to know where you are going. Navigation can be as basic as looking at the sun and stars, or as technologically involved as GPS navigational equipment.  

In the most basic forms, a compass can give you an idea of your direction, a time piece will give you an indication of your longitude, and a sextant can be used to measure your latitude. Paper charts can identify dangerous areas and give you guidance to reach your destination.  

IMG_2617.PNG

Many people view paper charts as they view a chart plotter, but this is not the case. A chart will not tell you where you are or where you want to go; it merely tells you where things are located in the world, you need to do the rest! This lack of convenience is out weighed by the fact that a paper chart will never "not work". You will never open a chart to find that your subscription has expired, or it's battery is low, or that an update has occurred and you need to log in to unlock your chart. A paper chart will always tell you where land masses are located as well as hazards and depths. 

Electronic charts are convenient, but can decide "not to work" when you need them most. We personally like to have electronic charts available to us because at any point we can look at them and know where we are, how fast we are moving, and where we are going. We understand that this is a convenience and also rely heavily on paper charts with traditional navigational equipment. I use a sextant to take a noon sight where I then calculate our position. Then I plot our position on the paper chart and record the data in our log book. After all that, I compare my findings with the electronic charts and see how close I was to the "true value". During the rest of the day, we enjoy the convenience of the electronic charts. One of our favorites is when we are approaching a waypoint. We will use the electronic charts to know when we reach that point and then use it to set our new heading. 

IMG_2887.PNG

Yes, we rely heavily on them for their convenience, but should they fail, we know how to navigate without them and how accurate we really are.  

Electronic charts are "Really nice to have" but not necessary. Paper charts and the equipment to use them is mandatory to safely get you across an ocean. 

IMG_2736.JPG

While actual navigational equipment is critical to a safe passage, there is always the "Oh crap!" situation where everything goes wrong and your goal is to simply make it to shore. Your paper charts are gone, your log book washed overboard, and the waves ate your sextant. This is where situational awareness becomes very important. Imagine you are in the Atlantic Ocean and you just want to get home. You know you are close to the East Coast of the United States. Who cares if you show up in Florida or Maine, just head West! You will come upon land and can find a sea buoy to guide you into a port.  

IMG_2764.JPG

What if you have a Captain Ron moment where the compass falls overboard? This is where general awareness is important. The Sun rises in the East and sets in the West. By night, the Moon follows this same pattern and Polaris sits squarely in the North. The higher Polaris is from the horizon, the further North you are, and using the Sun and Moon you can find your way West to get back to a shore. The same holds true in any ocean in the world. The stars can be used as guides through the night sky and the Sun and Moon can guide you for East and West. 

In a moment of desperation, sail in the general direction of the largest landmass you want to find and deal with landfall as you get closer. The important thing is to make it back to shore where you can then get help and get food and fresh water to survive. 

How To Cross an Ocean: Steering

Steering is what distinguishes a yacht from a floating pile of debris! If you can steer, you can then elect where you want to go. If you can't steer, then you are adrift. 

There are various methods to steer a yacht, from fancy contraptions that convert energy in the form of gears, cables, and fluids, all the way down to the very simple stick (a tiller). The goal of steering is to manipulate a flap in the water called a rudder which will guide water in one direction or another and cause the yacht to turn. With the ability to turn, you can then steer and maintain a course. 

Whatever system you have, it would behoove you to familiarize yourself with it and fully understand how to service, repair, and rebuild your steering system yourself with only the tools you carry on board. 

Lets start with the simple steering systems and then work our way into the more complicated versions. Last, we will discuss what you can do when everything brakes! 

The most simple of steering systems is a tiller. A tiller is nothing more than a stick acting as a lever that delivers force to the rudder. When you push or pull the tiller, the force is transmitted directly to the rudder. The longer the tiller, the more leverage you will have to control the rudder. Tillers are wonderful because they are simple. The more moving parts you involve, the more points of failure you introduce into the system. A tiller is easy to maintain, as everything is visible in front of you with no hidden parts that can begin to fail quietly without notice. Tillers seem to have fallen out of favor as they are seldom seen on luxurious yachts, though they are very common on the most high performance of race yachts. 

The alternative to a tiller is wheel steering. Wheels are familiar to most people as they resemble the steering wheel of a car. People also think wheels look "shippy" even though the original "ship steering" was a tiller. Wheels take rotational energy and transform it into the lateral motion of the rudder via a whole host of convoluted methods, each with it's own list of problems and pitfalls. 

The most reliable of all the wheel steering systems is gear steering. This is where a quadrant with teeth is mounted to the rudder post. The wheel attaches to this by a small gear. The teeth interlock and the steering works reliably. The points of failure are limited (usually wear in the gears) and is easily maintained and repaired. The downside to this system is the wheel needs to be mounted right over the rudder. This tends to make this a rather uncommon steering system as the ship designers enjoy more freedom in wheel placement. 

The next system is cable steering. Here a cable is moved by the wheel which runs through a series of shivs to a quadrant mounted on the rudder post. The cables give the freedom to move the helm far from the wheel, as long as the cables can reach it. Weak points in this system are numerous, and the setup can get quite complicated. Each shiv can jam, causing strain on the cable which would lead to cable breakage. The quadrant itself can also break from stress, rendering the entire system useless. 

IMG_2233.JPG

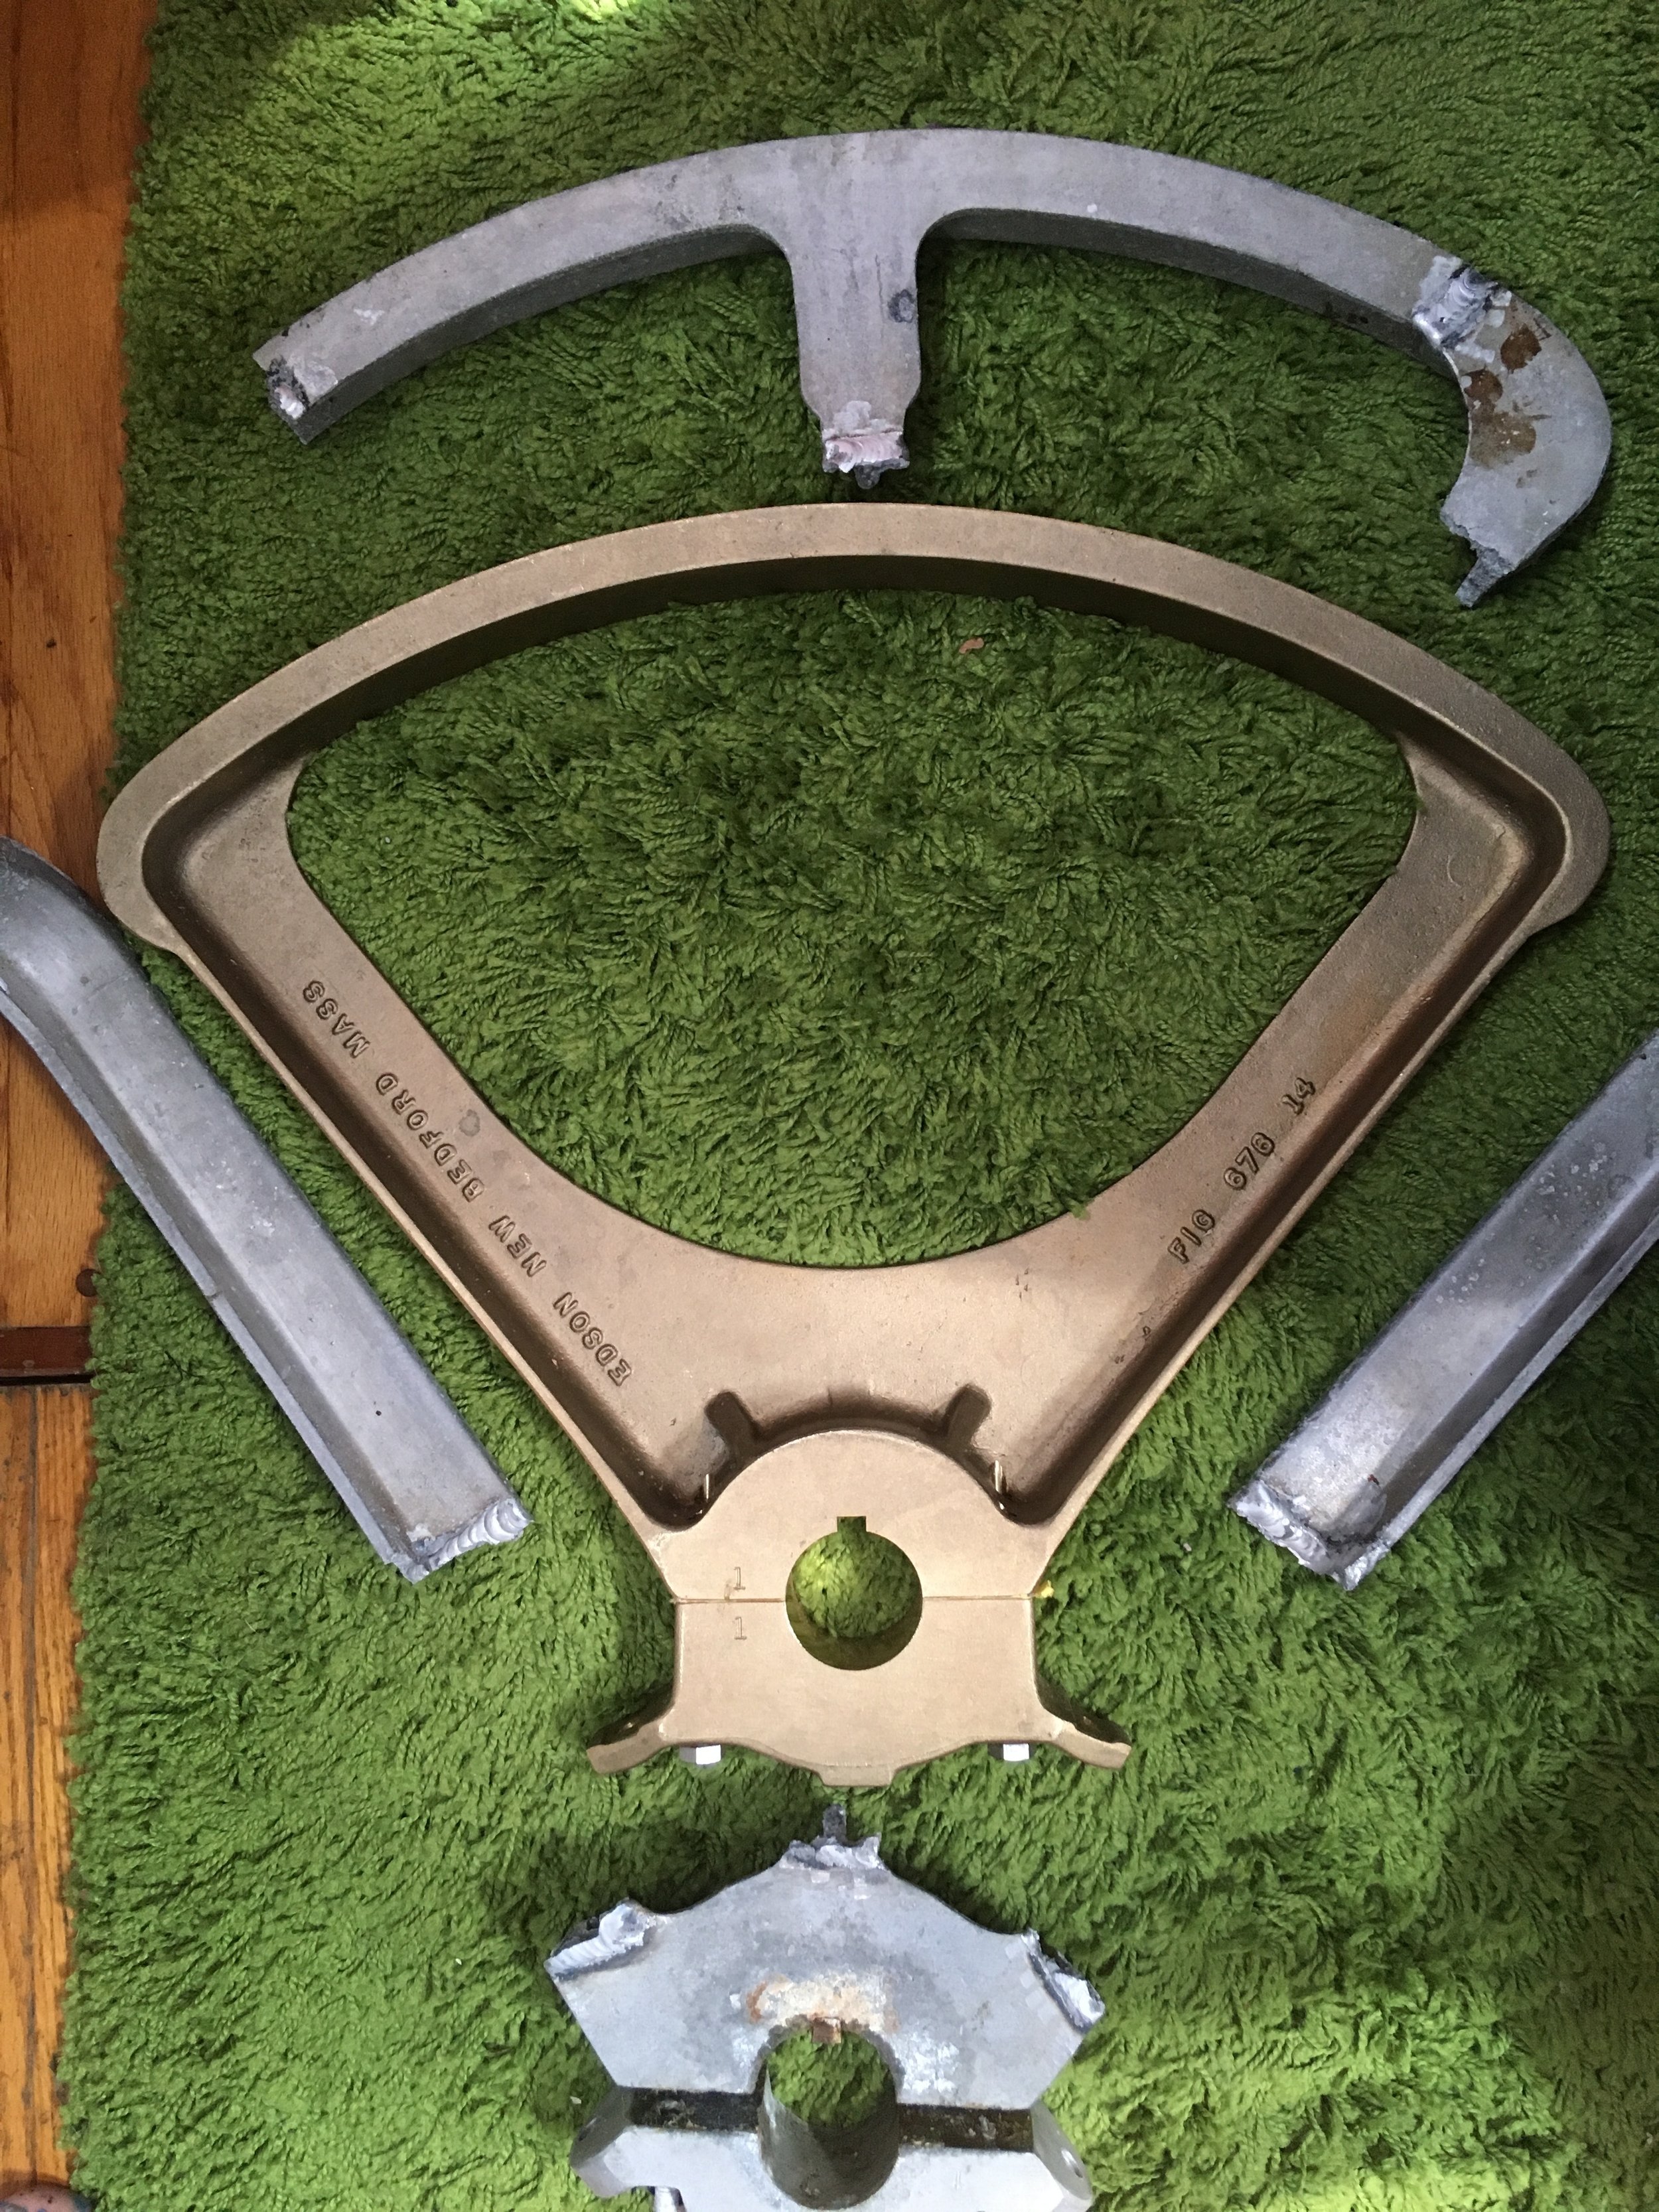
Aluminum quadrants are lighter in weight, but much more fragile. They have a tendency to shatter into pieces if the rudder is hit hard in a grounding. Bronze rudder quadrants, while heavier, are much more resilient in these situations, making them a much better choice of quadrant materials if you are planning to go offshore. 

Cable steering is simple to maintain and repair, once you understand how it works. If your first time seeing it is after something has broken, you might find yourself looking at a complicated spiderweb of slack cable and broken parts!

The last common steering system that utilizes a wheel is hydraulic steering. This system is the most convienient from an installation standpoint, giving you complete freedom of wheel placement with regards to the rudder post, but the worst system from a reliability standpoint. Hydraulic steering uses hydraulic pressure to push the rudder around, and relies on the airtight seal of the hoses, as well as all the connections and pumps involved in the process. If the system fails, you will need specialized equipment to repair and replace the damaged sections of hose as well as a very good understanding of the system to trouble shoot the whole setup.  

Now, what if you are out at sea and everything that could go bad does. Whatever steering system you have fails and your rudder falls off! You venture into your lockers to find all your spares and everything you have related to steering falls overboard!  Now what?!

Well, there are two simple options. One requires you to carry an item before you leave port, the other will be available from parts on the boat at the moment.  

If you carry a sculling oar, you can use the oar as a separate rudder steering system. The oar on its side off the stern of the yacht will give you the ability to steer your yacht just like a tiller on a rudder. Naturally, this setup only works if you have a sculling oar. 

The other option is to use spare lines and create a steering device out of them. A long length of line will act as a drogue in the water and provide resistance and pull in that direction. Tying a mass of line to a bridle system led to each corner of the stern will let you pull the tangle of line to port or to starboard. When you pull it to starboard, the drag will cause the yacht to pull to starboard. When you pull it to port, the drag will cause the yacht to pull to port. This gives you steering, but at the expense of a lot of speed. If you put too much line out, the drag will slow you down too much. Too little line and the drag will be insufficient to steer you properly.  

These were all situations where your steering fails, but who wants to steer all the way across an ocean? Why not turn on the autopilot and relax! Well, autopilots can fail too. Electronic autopilots can fail because of electrical reasons as well as mechanical reasons. Wind steering systems can fail because of mechanical reasons. Having the materials on hand as well as the expertise to fix the system you have is critical to being able to depend on the system to get you to where you are going. On our passage, our wind steering system began to suffer from chafe, and sacrificial chafe protection needed to be applied and reapplied to the control lines. We also had a shiv seize up and need to be serviced to restore proper steering, as well as have our aluminum rudder quadrant shatter in a grounding in North Carolina. 

You might be wondering about "Emergency Tillers" and why they have not been mentioned. The reason is, not all boats have them, and those that do tend to go ignored. Almost every person I have met who has an emergency tiller admits to having never tried it out. They had no idea how to set it up or use it. I myself was guilty of this, so before we set off on our big cruise across the Atlantic, we tested and set up our emergency tiller (who had lived in a locker for the past half century). As it turns out, we would have been in big trouble had we needed it out at sea as we were missing a large and important bolt to connect the tiller to the top of the rudder post. Thankfully, we were still in the United States and walking distance to a West Marine where I was able to procure myself this crucial bolt. 

This makes us part of a tiny population of cruisers who have an emergency tiller and have tested the setup, making sure they know how to use it. If you are going offshore, it would be a great idea to join this small group of sailors who are truly prepared. 

How To Cross an Ocean: Sails and Rigging

What makes a sailboat different from a powerboat? Sails and Rigging!

A beautiful and comfortable yacht with walk in closets, air conditioning, and every last gadget under the sun with non working sails and rigging is just a floating tomb that can't get you to shore. Eventually, you will run out of resources and die! You need to be able to get back to land, and to do that you will need working sails and rigging. 

It is imperative that you fully inspect all your standing rigging, running rigging, and sails before you head out to sea. If you have any problems, you need to address them before you head out to sea.  

Now, having perfect sails and rigging when you head out to sea doesn't mean that you will make it across safely without complications. While out at sea, problems can begin to occur, and you need to be prepared to manage and repair all issues associated with your sails and rigging.

IMG_2649.JPG

Lets start with your sails.  

Your sails need to be in good condition. This doesn't mean new, it just means "good". They can be stained, they can be old, but they need to be capable of getting you across the ocean and safely to the other side.  

Sails need to be inspected closely, giving extra attention to the condition of the sail cloth, condition of the stitching, and the condition of every cringle in the sail. 

The cloth should sound "snappy" when you flex it around. If it sounds and feels like a bed sheet or cotton tee shirt, then your sail cloth is old. This doesn't mean that the sail needs to be replaced, but it should raise a red flag in your mind about the condition of the sail. Old sails will still act as giant bags that can pull you down wind and get you across an ocean, as long as the sailcloth is not so old that the cloth will blow out on you. So, your sail sounds and feels like an old bed sheet, but is it ok to cross an ocean on it? Simply take the sail in to a sailmaker and ask them to evaluate the sail. Let them know that you are about to cross an ocean and ask them if they think this sail can make it across! They know sails and can tell you how much time a sail has left just by looking at it. If your sail is in good condition according to the sailmaker, then you should feel safe going out to sea. If your sail is not in good condition according to the sailmaker, then follow their recommendations before you head out to sea!

FullSizeRender.jpg

The stitching should be in good condition. You want to check for chafe and missing stitches. Be sure to inspect any place that running rigging passes near a sail, as the rigging can chafe away the stitching on that part of the sail. If the stitching is laying flat and looks shiny, then you are fine. If the stitching is loose, fraying, or missing, it should be repaired before heading out to sea.​

The last place that you should inspect on your sails are all the cringles. Cringles are the little rings in your sails, and each cringle is a stress point and a potential point of failure. The tack, clew, head, reef points, and reefing tie points are all potential points of failure. The reefing tie points are a very weak area, since they are not reinforced to resist stresses, they are very easy to rip if you are shaking out a reef and forgot to untie one of the reefing ties. 

The cringles should be rust free, and all the stitching around the cringle is in good shape. The sailcloth around the cringle should also be in good order, ending neatly inside the cringle without any fraying around the cringle. 

FullSizeRender.jpg

Each cringle is a potential failure point, so reducing the number of cringles is a great way to reduce your exposure to problems.​

Reefing tie points are the little ropes that go through your sail that you tie to hold the bottom of your sail neatly when you are reefed. If you have lazy jacks, they will hold your sail when it is reefed. A sail tie at the end of the boom will hold the end of the sail in place without the need of tying the little ropes! If you don't tie the little ropes, you won't have the issue of ripping the sail at these points. ​

Not putting the little ropes in the sail means that you have reduced a large number of potential failure points! In our mainsail, the first reef has 4 cringles, the second reef has 3 cringles, the third reef has 3 cringles. That's 10 potential failure points that can be removed by simply not using the little ropes.​

The second area that can be improved is the tack points for reefing. Cringles in the sail are a potential fail point, while having the tack stitched onto the side of the sail with webbing will mitigate this problem by simply replacing your "hole in the sail" with a stitched on loop.​

In our mainsail with three reefs and a Cunningham, the number of cringles was reduced from ​20 to 7! The tack, Cunningham, head, clew, 1st reef clew, 2nd reef clew, and 3rd reef clew are the only "holes in our sail" that are loaded.  

Now, having good sails when you set out to sea doesn't guarantee that you will arrive on the other side of the ocean with good sails! You need to be able to check the sails yourself and you should be able to carry out any repairs along the way. ​

It would behoove you to carry spare sailcloth, sail thread, and a method to sew the sail. You can have a fancy and expensive sewing machine, or you can also have a "Speedy Stitch" hand sewing instrument. Having it is great, but be sure you also know how to use it. Reading the instructions is nice, but be real here: open the thing up and practice with it before you go out to sea! While in shore, you can pull up a YouTube How-To video to answer a question, but you can't do that out at sea when you actually need to do the procedure.​

While out at sea, you need to constantly check your sails for chafe! A common problem that will happen when sailing downwind is the mainsail chafing on the shrouds. It will reduce your speed, but simply not easing the mainsheet as far will keep your mainsail off the shrouds and reduce this point of chafe. ​

Your headsail's lazy sheet is another point of potential problems. The lazy sheet will lay limply across your deck, rising and falling as you move through the seas. This lazy sheet is just rubbing over and over again, chafing itself, as well as anything else it is touching. This may seem unnecessary to a coastal cruiser, but when crossing an ocean, you will be on the same tack for days, if not weeks! Something that is rubbing a little today will rub constantly until it saws all the way through! ​

Since you will be on the same tack for so long, it is easy to simply walk the deck and check for potential chafe points and position the lazy sheet in such a way that it doesn't rub. I like to pull enough slack on the sheet that it will lay flat and still on the deck all the way up to the clew, then raising up to reach the clew. ​

IMG_2265.JPG

​Aside from making sure your sails are in good order, it is important to carry the right kinds of sails. Having your working sails (mainsail and jib) is critical as these are the most commonly used sails for general conditions. You should also carry sails for the extremes! Storm sails and light air sails are a good idea to have with you, but not a "Need to Have" item. 

It might feel like we are berating sails and not going over rigging as much. The reason is sails​ are big and it's easy to overlook a small problem on such a large sail. The truth is rigging is smaller, but just as important to inspect.

Steel rigging rusts, corrodes, and breaks, but it is quite resistant to chafe from sails and sheets. You want to check for broken or corroded wires, paying extra attention to the ends of the stays (this means the top of the stay way up on the mast too). If you see any signs of corrosion or cracks, it is important to repair or replace the failing component. ​

Just like with sails, it is important to be able to carry out repairs at sea. With steel rigging, you need to carry the materials to fabricate and install a new replacement stay. To do this, it is wise to carry a length of wire equal to your longest stay. The problem with this plan is if you break two stays, you can only replace one of them! Steel stays are heavy, so carrying a full set of new rigging carries with it a steep weight penalty! Just like with sail repair, having the tools and parts to repair your rigging isn't enough; you need to know how to use them and with rigging, you need to know how to use them very well! Steel rigging HyMod fittings have little cones that crush down on the steel wires of 1x19 rigging cable and are one time use item. If you only have one, you better know how to use it and use it well because you only get one try with it!​

FullSizeRender.jpg

With synthetic rigging, you don't have to worry about corrosion, but you do have to worry about chafe. Be sure to inspect your stays for fuzziness and chafe, and be sure that nothing is rubbing on the stays while you are voyaging. It is very important to make sure that the lazy sheet isn't rubbing on the forward lowers or cap shrouds because they will saw through your rigging in the course of the ocean crossing. 

Synthetic rigging is weaker in the form of chafe, but the tradeoff is very little weight. Since there is practically no weight penalty, you can feasibly carry a full spool of rigging allowing you to fabricate all your stays again. This removes the issue of "which stay to replace" if you break two stays, you can easily replace both! 

Keeping an eye on your sails and rigging before you go out to sea is important, but keeping an eye on your sails and rigging while out at sea is critical!  

Your sails and rigging are the powerhouse that will bring you across the sea. Keeping them in proper working order is paramount to making it across the ocean. The fancy coffee maker might be a cool gadget in the galley to show off at the marina, but it is absolutely worthless when it comes to getting your yacht to the other side of the ocean. Sails and rigging are what make your yacht a sailboat, which is why it is critical that you maintain them in working order and know how to work on them yourself. Accidents happen and you will have no outside help on your yacht. You will need to know how to take care of any and all problems that could arise with your sails and rigging as you cross the ocean.  


How To Cross an Ocean

FullSizeRender.jpg

Setting sail for land across the horizon may sound like a dream, literally sailing as far as the ocean is wide! But how does one go about preparing and then actually sailing across an ocean? 

The short answer is, it's easy so don't worry about it. The long answer will be discussed in the next few posts.

To sail across an ocean, you need five things: 

  1. Sails and Rigging
  2. Steering
  3. Navigation
  4. Fresh Water
  5. Time

Sure, things like food and a dry place to sleep are nice, but you don't need it to cross an ocean! It is very important to set apart two lists, one is everything you think you need, and identify these as "Nice to have" and then another list which is these five items identified as "Need to have". Once you figure out the difference between these two lists, everything will become clear and easy! 

Now, this list doesn't include things like food or sun protection, I know, but the truth is, you don't need these items to sail across an ocean. The longer the list, the more complicated everything becomes and the harder the it will be to cross the ocean. 

FullSizeRender.jpg

The smaller you keep the list, the easier your crossing will be, even though it might not be as comfortable! The truth is, easier is more comfortable!